In This Issue ...
|
October 2006 |
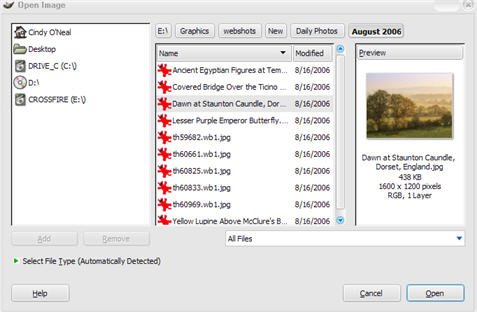
GIMP Tips and Tricks I - Getting Started ...Main website: http://www.gimp.org/windows/ If you downloaded and installed GIMP (FREE) as a result of last month's issue of CompuQuickTips, you will certainly want to save these next three issues for reference. I'll be helping you with nuts and bolts "how to's" so you will be able to be up and running with it as quickly as possible. Resources for new users ... Make sure you download the help file for GIMP when you download the initial installation file. The help setup file is meant to be installed separately. The file to download will be a little over 30 Mb with a file name of gimp-help-2-0.10-setup.zip for US Windows users. When you open the zip folder, you will see the same file name with .exe at the end of the file name. Click this file to install the help files. If you are connected to the Internet when you are using GIMP, you can have the latest user manual open in your browser window. Above are a few basic links you want to keep in your arsenal. Opening and Saving Images ... To open an image, click the word File, then Open on the Toolbox panel. Navigate to the file you want to open and click it to select it. GIMP will open just about any image file type, certainly the more popular types like .jpg files. Click the Open button and your selected image will open in its own special working window. You should see three panels, each with its own title bar and able to be arranged on your Desktop to suit your While you can open any image type, if you intend to change an image or want to work on it again, you must save a copy in the GIMP format. This will insure your layers are intact and you will have access to all the special options while working. To save a copy in GIMP format, click the word File at the top of your image window, then Save As. Navigate to the folder you want to save your working copy in. Type the name of your file copy in the Name box at the top of the window. At the bottom of the save window, click the little arrow to the left of the words Select File Type by Extension. Choose GIMP SCF image as the file type. Click the Save button and you will be ready to play. Your original will be unchanged and you can work on your GIMP copy all you want. When you are finished working on your .xcf file and want to share it in a more public format, like a .jpg file, click the word File again, then Save A Copy and save a copy in jpg by clicking Select File Type (by Extension). You will still have your working .xcf file, but a copy in the other (jpg) format will be where you saved it. By saving a copy, GIMP has converted the file and saved the copy as a .jpg file. Resizing
If you open a jpg file (a photo file), the first layer is the original image. It is named Background. To copy the layer, left click on it in the layer panel and drag it to the Duplicate Layer button at the bottom of the layers panel. The little eyes to the left of each layer are what makes the layers visible or not. Click the eye to "turn off" each layer you don't want to see. With multiple layers, you can left click and drag each layer to different positions in the stack. Naming layers can help keep you organized. To rename a layer, right click on the layer and choose Edit Layer Attributes. Type the new layer name in the name box and click OK. You can also double click a layer name to rename it. To delete a layer, click it once so it is selected, then click the little trash can at the bottom right of the layers area. Resize Add a Drop Shadow ... Before you can create a drop shadow, you must select something. If you made a layer copy and made it smaller, click the layer so it is selected, then click the word Select, then ALL at the top Stroke a Selection ... Add a nice line around your selected area by right clicking on the selected area. Choose Edit, then Stroke Selection. A stroke dialog box will appear. Decide how wide you want your outline to be and the line style etc. Then click the Stroke button. The outline will be the foreground color chosen in the color area (so choose it first). System Restore ...System Restore, when used properly can be one of the best tools in your computer bag of tricks. You can use it literally to go back to a time when your operating system was working the way it should. You will know when System Restore is what you need to turn to. You may have recently installed a new software application or updated an existing application and all of a sudden your computer seems to be locking up, or error messages you haven't seen before may begin appearing. Using System Restore can put damaged system files back the way they were before that nifty new software was installed and corrupted them. Notice the word System. System Restore will restore Windows system files, not program files. It automatically tracks changes to your computer and creates restore points before major changes happen. These restore points are created before new device drivers, as well as automatic updates are installed. In addition, healthy system checkpoints are usually created daily, without you having to do a thing. System Restore should not be the first thing you turn to when your computer burps. If you get an unexpected freeze or odd system error message, try turning your computer completely off with a normal shutdown. Wait a few minutes and restart it. You would be surprised how many glitches can be cured by doing something that simple. Windows XP is much better than earlier operating systems when it comes to figuring out problems and actually healing itself. Using System Restore won't uninstall bad software. If you suspect a software application is the cause of the problem, you certainly need to uninstall it using Add/Remove Programs in your Control Panel. To check out System Restore, click the Start button. Move your mouse pointer up to All Programs, then Accessories and System Tools. Click System Restore. This will open the System Restore Wizard and is very straightforward after that. On the Welcome screen, click Restore my computer to an earlier time. Then click Next. You will see a Select a Restore Point area. Select a date from the calendar that is shortly before you guess the problem began and click Next. In the Confirm Restore Point Selection area, make sure the correct date (restore point) is chosen. Make sure you don't have any other programs running before you click Next to let System Restore do its job. Actually, it wouldn't be a bad idea to make sure you have everything you are working on saved and closed before you even open System Restore.
Pay Attention ... System Restore doesn't monitor and won't change the contents of your My Documents folder. Your personal files will remain intact. The Desktop, however, is not a protected folder, and any files that exist there could be lost during a restore operation. So before you do a System Restore operation, you need to make sure you move any critical files you have saved on the Desktop to your My Documents folder. If you open System Restore again after performing an actual restore of your system files, you will notice a new addition to the initial Welcome page. In the task area, you will see Undo my last restoration. This is pretty self explanatory, but you need to realize it isn't to be taken lightly. Any time you deal with system files, replacing or restoring, there is a risk it won't always be perfect. It is just the nature of the beast, but for the most part, Windows System Restore does a darn fine job. Never think for a moment System Restore has anything to do with, or can be a substitute for backing up your personal files. Your personal files are files you have created yourself and have nothing to do with your Windows System files. Make sure you back up your personal file as regularly as you need to feel comfortable. If the worst ever happens, you can always buy a new machine. You can always reinstall your software. You cannot replace images, documents or any other files you have created yourself. Cleaning out System Restore ...While System Restore is a great tool, it needs a lot of hard drive space to work properly. You need to make sure you always have at least 300 MB of free hard drive space on your main hard drive, and that is a conservative estimate. With today's computers having larger and larger hard drives, System Restore can use several GIG of hard drive space. If you are one of the lucky ones with a relatively new machine and a huge hard drive, this probably doesn't seem like much of an issue. It can, and does, become a huge issue more often that you would think it could. The more space your System Restore files use, the longer it can take to Defragment your hard drive. Our new (huge) hard drives need to be defragmented as much as the oldies did in order to keep them in top shape. Your computer can become noticeably slower because even though those files are pretty much just sitting there, your disk still wants to peek at them when it is accessing or looking for other files. And if you have a huge hard drive, you have a huge allocation for your System Restore files. Your virus program may seem to refuse to get rid of an extra cootie file or two, for no other reason than the file in question is located in the System Restore area and it doesn't have permission to access it. If you have files in your System Restore that are infected, your System Restore is pretty much useless. There is no sense restoring cootie infested files. The only way to totally clean the virus from your entire system is to "flush" the System Restore area.
To clean out your old System Restore files and leave the latest restoration point, click the Start button, move your mouse pointer to All Programs and go to Accessories. Under System Tools, choose Disk Cleanup. That's right, you can combine cleaning out your System Restore files with a quick cleanup. Select the drive you want to clean up and click OK. When the Cleanup window appears, click the More Options button, then click the Clean up button in the System Restore area. Click OK, then Yes to clean it up.
Any time you know your system is infected with a virus, you should temporarily turn off your System Restore. Once you have the virus eradicated, you can turn it on again. To turn off System Restore, right click My Computer and choose Properties. The keyboard command is Windows key+Break. When the System Properties window appears, click the System Restore tab. Click to place a check in the box next to the words Turn off System Restore on all drives. When you click OK, you will see a confirmation dialog box warning you that turning off System Restore will delete all existing restore points. Click Yes to continue and restart your computer. This will delete all your System Restore files. When you restart your computer, be sure to right click My Computer again and choose Properties, click the System Restore tab and UNCHECK that box to turn your System Restore back on again. It is a very valuable tool and you don't want to do without it any longer than necessary. Think of it as kind of an insurance policy for your system files... always there when you need it. Gem ... Adobe Acrobat ReaderIt is still the only game in town when it comes to making sure your documents can be viewed on any computer. The Acrobat Reader is absolutely free and there is no reason not to have the latest version on your computer. Download size is 27 Mb, so if you are using a modem connection, count on a couple of hours of quality downloading time. It is certainly worth it though. Before Downloading and Installing ... You may find you already have an older version of Acrobat Reader on your machine. Be sure to Uninstall this before you download and install the newer version. Click the Start button (bottom left of your main screen), move your mouse pointer up to Control Panel and click it. Once you are in the Control Panel, click Add/Remove Programs and scroll until you see the older version of Acrobat Reader. Click it to select it, then click the Remove button. If you try to remove older versions after teh new is installed, you run the risk of corrupting some of the files needed to run the new version. This will help you avoid having to reinstall the newer version. Downloading ... Another program that can be installed before you know it is the Photoshop Album Starter Edition. Odds are you may not really need this little goodie. Again, click the words Learn More and make an informed decision. If you don't want either of these "extras," be sure to UNCHECK the boxes to the left of them BEFORE you finally click that big, red download button. If you have both unchecked, you can trim over 7 Mb off that download. Every little bit helps!
Once installed, you will probably notice a new shortcut icon (or two) on your Desktop. It is perfectly safe to delete this too. The Acrobat Reader is one of those programs that doesn't really need a shortcut. Double clicking any .pdf file will cause your Reader to open. It is always there when you need it. Tiny Treasure ... HTTP File Serverhttp://www.rejetto.com/hfs/Have you ever wanted to send someone a file quickly, without going through a third party? Would you like to share music files with a friend or friends, but prefer not to open your computer up to the entire planet in order to do it? Well, HFS can help you do just that, and only when you want to and who you want to with. I love software that doesn't require installation or a lot of brain cells to use. HFS is less than 600 Kb to download and the file you download is the actual program. Just put it where you want to keep it, and click the file to make it run. HTTP File Server (HFS) turns your Internet connected computer into a temporary file server. It makes the files you want to share available via a simple web page URL (address) you can either send to your friend or give over the phone. Once they go to that special web address, they will see a list of the file or files you are sharing and can just click them to download to their computer. This is really great for files (if you have a nice fast connection) that are too big to send via email. When you send a file via email, time is spent actually sending (uploading) the file. Then the person receiving the file has about the same amount of time to wait to receive (download) the file. With HFS, the sending part (uploading) is eliminated. The file stays on your computer and your friend can download it directly from you.
Security ... The security aspect seems (to me) to be quite acceptable. The only files available for sharing will be the ones you drag into the HFS left window pane. When HFS is opened and running, you will need to let your firewall give it permission to access the Internet and act as a server. I use ZoneAlarm, so that was just a simple click. Once the program is turned off, the "door" is closed and you need to give it permission the next time you use it. I like that. With all the "file sharing" programs out there, security should always be at the front of your list of things to pay attention to. This is a more personal way to share exactly what you want to share with your friends only. All you need is to find someone with a really huge MP3 music collection, become bosom buddies, and introduce them to HFS. Seriously, music files are just an example. I'm sure you can think of all kinds of files you would like to share, but they are just too big using conventional means. Medium Caveat ... While old Mrs. Wizard has a tendency to look for nifty tools and programs designed more for beginning or less experienced computer users, occasionally she finds a goodie that is too good not to share. This is one such goodie. It may not be for everyone, but those of you who need it will certainly appreciate its functionality and ease of use. Quite a few of you who want to use this may need to do a little tweaking on your cable or DSL modem or router with a built in firewall in addition to any software firewall you may use. You will need to have a port forwarded and designated in order to make HFS work properly. I am certainly not a modem firewall expert and (of course) couldn't find the original manual for my cable router. It only took about 20 seconds though, to find all the information I needed on my particular model with Google, and about an hour to work up the courage to actually make the change. It was even less helping my friend Ruthe set it up on her machine... so it can be done by real humans. I feel as though Ruthe and I gave it the acid test. Once we had it set up, swapping files back and forth was great! Port Forwarding has to be done on the computer running HFS, so the computer wanting to reach your files can actually reach you via the Internet. You are basically opening a private door and anyone you give the key (address) to can access the files you want to share. The person downloading your files does not need to have HFS installed on their computer. If you feel you would like to use this software but feel uncomfortable making the port adjustment on your cable or DSL modem/router, you might want to give your friendly neighborhood geek a call and let them give you a hand. After that, you will LOVE it! A quick way to find out if you need to make a port adjustment is to open HFS, click the word Menu, then Self Test. It will let you know if you are accessible or not. Quick Tips ...W
|
Consciousness:
|
|
I had
|
||
They told me
|
||
I used to be
|
||
Spelling checkers
|
||
|
Got more questions? Search mrswizard.com and compuquicktips.com with Google! Want to have access to ALL the daily tips (mucho plenty and growing!) in one convenient place, all at once? Not to mention an awesome wallpaper collection AND Screensavers! Make a small (one time) donation and gain member access to the Happy Dragon area. Mrs. Wizard | Newsletter Archives Copyright© 2006 Cindy L. O'Neal |
|

 When you open GIMP the first time, you will see two window panels. On the left will be the Toolbox. It contains the top level file menu and various tool buttons with an options area below for each tool when it is selected. On the right you will see the helper panels, including the Layers panel, brushes, gradients and patterns. You may also see a Tip of the Day window. Click the Close button on the Tip of the day but leave the other two panels open.
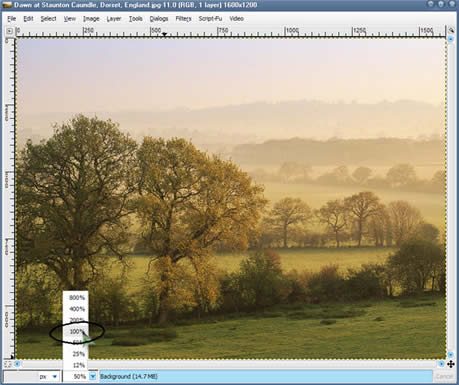 particular needs. The working image window can be sized just like any other window. The Zoom information is easily accessible at the bottom left of the image window. Click the little arrow to the right of the percentage indicator to choose 100%, which is always the actual size of the image you are working on.
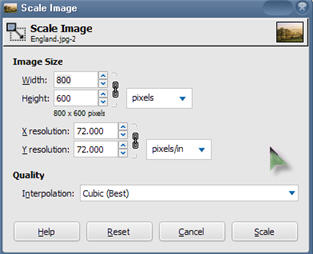 an image ... To resize any image, click the word Image at the top of the opened image window, then Scale Image. A small dialog box will appear. Type in the width you want. Click in the Height box and notice how the height is automatically changed proportionally. You can choose between pixels or percentage by clicking the little down arrow to the right of the box with the word pixels in it. Notice quite a few other units of measurement available when you click that box (neat huh?). If you don't want to scale your image in proportion, click the little link to the right of the size boxes. Once unlinked, you can resize the height and width separately. When you have everything the way you want, click the Scale button at the bottom right of the dialog box and go for it. Your right mouse button can be used to scale an image too. Right click on the image, then choose Image, Scale Image. Save your resized image as a separate file. You never know when you will need the original.
 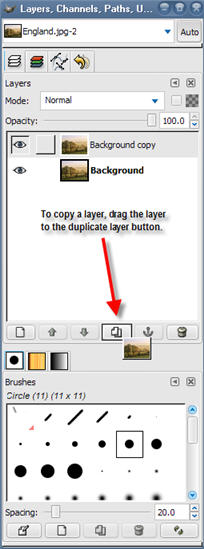 Layers ... It is always good when you can work with Layers. Always know where your layers panel is and make friends with it as soon as possible. You can copy layers and play with the copies. If you make a mistake, just delete the bad layer and make another one. Layers are great!
 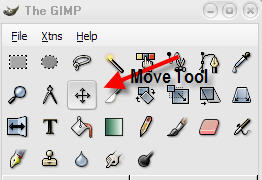 (scale) individual layers by right clicking the layer you are working on. Choose Layer, then Scale Layer. You can get some pretty neat effects this way. Say you have copied a layer, then made one layer much smaller than the other. It will appear to float over the top of the larger layer. Click the little Move Tool (looks like crosshairs in the toolbox) to move your small layer around.
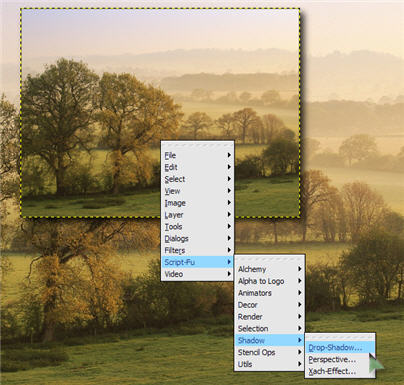 of the image window. To make sure only the small part is selected and not the entire layer, click the word Select again, then Invert. To do a quick Drop Shadow, right click your selected area, then choose Script Fu (I have no idea what that means), then Shadow and Drop Shadow. Drop Shadows are treated in a very interesting way in GIMP. When you create a drop shadow in a GIMP image, it actually becomes a new layer. Use the Move tool to move the layer anywhere you want. You can even add special effects to the shadow layer only. If you don't like the results, delete the drop shadow layer and go for it again. There are plenty of little tweaking choices you can fiddle with in the Shadow dialog box.
 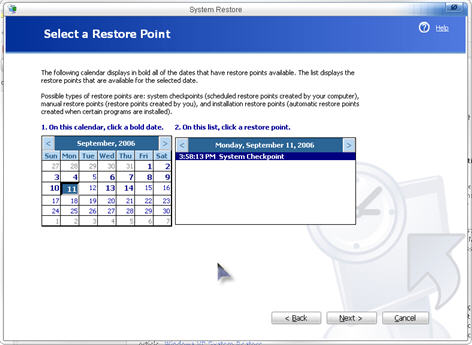 After it is finished, you should restart your computer, even if you aren't prompted to do so. It's just a good thing to do. Once your computer restarts, check it out thoroughly to make sure the change you made was for the better. If all is well, it is a good idea to check any software installed after the restore date you chose to make sure it is working properly. You may need to reinstall it.
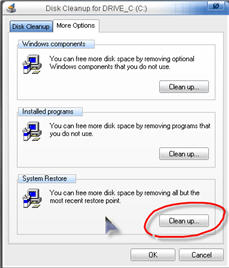 Fortunately this is a pretty easy process and even if you don't have virus problems, it doesn't hurt to clean out your System Restore files periodically and just give your machine a fresh start. The idea is to delete all the System Restore files except for the last restore point. If your computer is healthy and working fine, this should be no problem. Any great operating day for your machine can be a good day to thin down your System Restore files. You can do this little cleanup job every few months, or as often as you are comfortable. There is really no reason to save months and months of System Restore files. The latest restoration dates you can use are always going to be the best.
 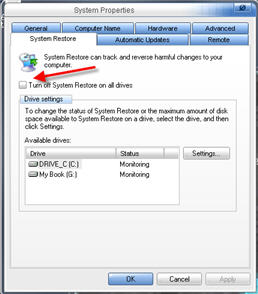 If you have a virus issue, you need to shut your System Restore completely down, restart your computer, then start System Restore again. This will give you a totally fresh start, and delete ALL your System Restore files.
 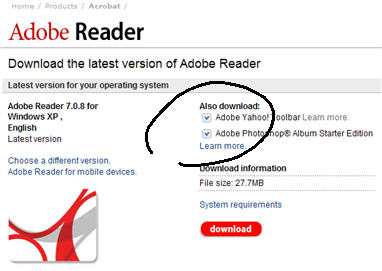 Make sure you only download the
 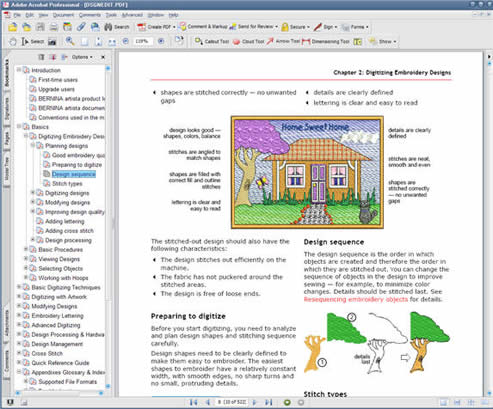 When you click the download button, the instructions on the Adobe site say to choose to "RUN" the file, rather than save it. This is because the first file is really a very small download manager file. You can save it on your Desktop and run it any time you want. Once it runs, it will combine the downloading and installation process. Once the "real" installation file is finished downloading to your computer, the installation will begin. When Acrobat Reader is finally installed, delede the installation file you downloaded and saved on your Desktop. You won't need it any more.
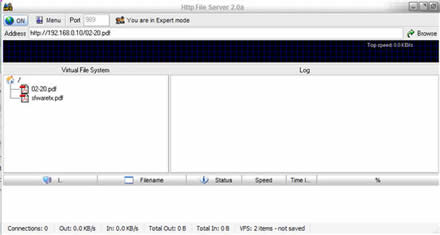 To use HFS, just open it and drag the files you want to share into the left window pane. A URL will appear in the Address box at the top of the main window. This is automatically copied to your clipboard so you can simply paste it into an email to the friend you want to be able to pick up your file. When I was testing this little goodie with my friend Ruthe, we just shared the information over the phone. After a couple of faltering steps, we were off and running, quite amazed at how easy it all was.
 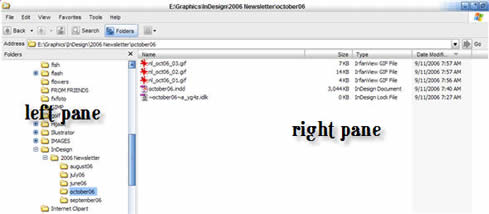 indow Panes ...
 Bar Paths ...
 Open My Computer (or any folder) and click the word Tools, then Folder Options. Click the View tab and make sure there is a check in the box next to the words Display the full path in title bar. That's all. From now on, the full path of any file you open will be displayed in the title bar of the opening program. What a great way to learn about paths!
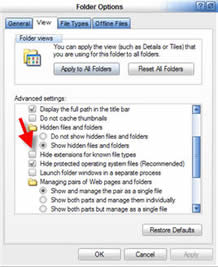 he Adult View ...