| |
Backup Backup! ...
 Yes, it is time to think about spring cleaning, your hard drive that is. But before you do, and especially if you want to do some really aggressive cleaning, make sure you have your personal files in a safe (away from the computer) place. If you have a relatively new computer, you probably have a CD burner. This is a great time to make it begin earning its keep. Yes, it is time to think about spring cleaning, your hard drive that is. But before you do, and especially if you want to do some really aggressive cleaning, make sure you have your personal files in a safe (away from the computer) place. If you have a relatively new computer, you probably have a CD burner. This is a great time to make it begin earning its keep.
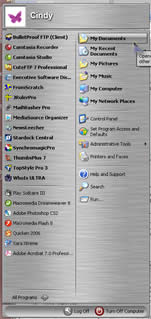
The first thing you need to establish is where all your personal files are. If you have been good, everything you have created is in your My Documents folder. This is always the easiest folder to find on your hard drive. Whenever you click the word File and Save or right click and choose Explore, your My Documents folder is always a handy choice. You can always get to the contents by clicking the Start button and looking to the right of the popup area.
Back to that CD burner you haven't had a chance to make friends with yet ... Blank CDs come in 2 flavors, CDR and CDRW. A regular CDR will hold 600 to 700 Mb of stuff and can be used until that 600 or 700 Mb is all used up. You can't erase anything on a CDR; once you put something there, it is there, but you can replace old files with new files. The old file just sort of disappears and the new file occupies a diferent (invisible to the naked eye) space on the disk. A CDRW can be used over and over, sort of like an extra hard drive, certainly bigger (600 to 700 Mb) than what you could get on a floppy disk. You can delete files on a CDRW, erase it and start over, and add files any time you want. CDR's can be purchased in bulk (less than 20 cents apiece) or in packs of 5 or 10 (still really cheap). CDRW's are a little more expensive, but still probably cheaper than the old floppy disks used to be. Don't you just LOVE modern technology.
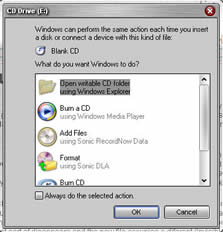 If the software that came with your CD burner is confusing, let Windows XP do all the work for you. As soon as you insert a blank recordable CD, a window will appear asking what you want to do with it. Choose Open writable CD folder using Windows Explorer and click the OK button. If the software that came with your CD burner is confusing, let Windows XP do all the work for you. As soon as you insert a blank recordable CD, a window will appear asking what you want to do with it. Choose Open writable CD folder using Windows Explorer and click the OK button. 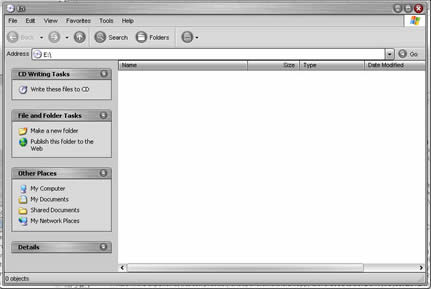 The next window you see will be an empty folder just waiting for you to drag the contents of your My Documents folder, or any other files or folders into the white area on the right. About the only skill you need at this juncture is the ability to left click and drag a file from one window to another. The next window you see will be an empty folder just waiting for you to drag the contents of your My Documents folder, or any other files or folders into the white area on the right. About the only skill you need at this juncture is the ability to left click and drag a file from one window to another.
Open your My Documents folder and position the window in a comfortable place next to your Writable CD folder window. If you only want to backup or copy a few files, left click on each individual file and DRAG them into the right window pane of your Writable CD folder. When you are finished dragging and dropping, click the words Write these files to CD on the left pane.
After you click the words Write these files to CD, a new window will appear for you to enter a name for your CD. You can leave the current date if you prefer. Click the Next button to continue, then sit back and relax. All you need to do is wait for the CD to be spit out when it is finished, put it in a protective container and make sure you know where you store it. When you hit the Finish button on the CD Recording Wizard, you have a CD that can be used in most any other computer CD player. It is more than just a great way to back up your personal files, it is a very inexpensive way to share files with friends that are too big to send via email.
Serious? Start Over ...
Sometimes the only way to really cure a really messed up Windows system is to totally erase your hard drive and begin anew with a nice fresh Windows installation.
It could be anything that causes corruption ... various software, some utilities,
You will need to reinstall any software you installed. it is a great opportunity to avoid any mistakes made in the past, like installing too many programs at one time, you never know who the culprit will be when you do this. Only when there are no other options, you should consider starting over. Most computers come with a very special way to do this. On older computers, you may have a Restore CD. Putting it in your CD drive and starting the computer should begin the process. Newer computer have such large hard drives, a portion is set aside for restoring your computer to the way it was when it left the factory. The next time you start your computer, look at the black screen you see first. It may say something like, "Press F2 to begin setup." Or whip out the owner's manual that came with your computer. You did save it, right? There should be something in there about restoring the machine to the original configuration.
This is NOT something you should do as anything other than a last resort, and I do mean last resort. Even if you take your machine to your friendly neighborhood techie, starting over with a clean hard drive and fresh installation of Windows is not that simple. Your friendly neighborhood computer tech shop has all kinds of tricks up their sleeve and can get your computer back in fighting shape in no time at all, saving you a lot of time and aggravation. You (or your tech) will still need to make sure all the Windows updates are current, and if your computer is a few years old, that could take a while if you do it yourself. You will also need to reinstall any software that didn't come with your machine when you purchased it... not a fun thing to do. This is when you will truly appreciate all those backups of your personal files you thought you never would really need. You will also be a much more happy camper if you have organized all the installation CDs you have used, and kept track of your registration information (on a text file you have backed up, of course). None of this is easy, but if you ever need it, you will experience the religious experience of your life knowing it is handy. No restoration is perfect, but if you have your personal files in a safe place, it doesn't need to be quite as painful as completely starting over.
 Tiny Treasure ... Distortit Tiny Treasure ... Distortit
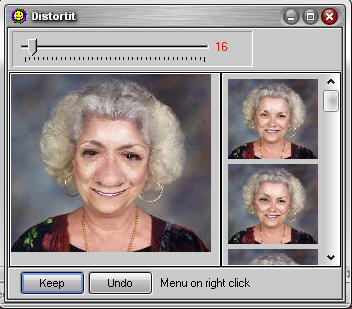
I LOVE when I stumble on a Tiny Treasure that is nifty and doesn't even need to be installed to use... Just click the little .exe file and go for it. Distortit is one of those little one trick Treasures, but it sure is fun to use. It is a very simple image morphing tool that allows you to create funny variations of pictures by applying magnification effects to areas you click on. When you are satisfied, just right click and save your new masterpiece as a .bmp or .jpg file. Everything you need (including an information file) is in one zip file. Weighing in at 230 Kb, this little goodie won't even make your machine burp, but it sure is fun to tinker with. Unzip it into a folder of your choosing, then click the .exe file to begin the fun. Right click and choose Load, find your picture and start clicking! Nothing is etched in stone until you hit the Keep button. You also can't apply another effect until you hit the keep button. Be sure to read the Readme file included in the zip folder. It will tell you all you need to know to use it.
Download
Quick Tips
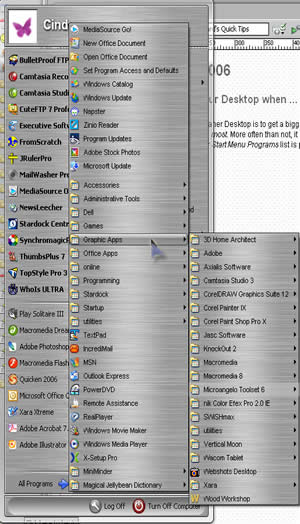 You know you need to clean your Desktop when ... You know you need to clean your Desktop when ...
When you think the only way you will get a cleaner Desktop is to get a bigger monitor, it is time! The Desktop should be a reflection of your computer habits, nice and clean with only a FEW very important icons for shortcuts you use the most. More often than not, it becomes a catchall for every new program you install and every installation program or image you have downloaded. If your Desktop is cluttered, your All Programs list is probably cluttered too. If you organize your All Programs list, you won't need all that stuff on your Desktop. You will actually want to use your All Programs list instead of wading through all those Desktop icons you think are easier to see.
Take a look at your All Programs list. Click the Start button, move your mouse pointer to All Programs and let it linger until you see your list. Take a look at programs you have installed that may be grouped one way or another, preferably in a way that makes sense to you. For example, I use a lot of graphic programs, so I have them all grouped in a folder named Graphic Apps.
Begin by creating a new folder on your Desktop. Right click any empty area on your Desktop and choose New, then Folder. Give your folder a name to reflect the new group you want to create. Once you have it created, right click on it and (while holding down your right mouse button) drag the new folder straight to the Start button, (keep the right mouse button down) then to the words All Programs, then over to the All Programs list. When you let go of the right mouse button, you will see choices. Choose Move Here by left clicking once on the words. This will cause your new empty folder to be moved to your All Programs list.
Be sure to use your right mouse button to drag your folder. A left mouse button drag will only create a shortcut to the folder in your Start menu. You don't want a shortcut. You want the real thing. By dragging with the right mouse button, you will have the option to move the folder. You certainly don't need to have it add to your desktop clutter.
Now you can begin organizing! Left click and drag each related program folder on that list into your new group folder. Since all these folders are part of the Start Menu, a left click and drag will move those program folders into your new group folder, and your list will gradually become leaner and more organized. Instead of wading through a long single list to find just the program you need, you will be able to quickly go to the group you know the program you want is in, then linger over the program group and click the program shortcut to make it go. If there is a matching shortcut on the Desktop for the program, you can delete it because you won't need it any more.
The differences between midi files, wav, mp3 and Windows Media files ...
The reason they say midi vs wav when you read about suggested musical additions to your emails is because midi files are much smaller. Midi files are the little computer sounding songs you have heard on some web sites... no voices, just electronic music. Wav (pronounced wave with a file extension of .wav) files are for actual music or recordings, and they can be huge (up to 30 Mb for a three minute song) ... The compressed version of your .wav files are your windows media files or mp3 files, usually only 2 or 3 Mb for the same three minute song... The sound ain't too shabby either!
Remember
... There are a lot more QuickTips each month in the Member area. AND I've
gathered up all the videos and other goodies in the member area too, so they
are nice and handy. You won't have to dig through old newsletters to find
them. All it takes is a one time donation to show you care, and
the member area is all yours!
For more
information...
Warmest Regards,
Cindy O'Neal (aka Mrs. Wizard)
http://mrswizard.com
http://compuquicktips.com
Extra info:
Acrobat Reader tips:
http://mrswizard.com/archives/acrobat_reader_tricks.html
(for the older archived newsletters)
How to download: http://mrswizard.com/downloading.htm
Reader Support is what keeps CompuQuickTips FREE. Be sure and pass it along to
your friends and family and when you share something new, remember to say, "I
learned it from Mrs. Wizard!"
CompuQuickTips is sent to email subscribers only. If you feel you have received
this message in error, or no longer want to receive your monthly issue, just hit
REPLY to this email and let me know and I will be sure to remove you from the
list. If someone has forwarded this email to you and you don't want to miss a
single issue, hit the same REPLY button and let me know you want me to add you
to the subscription list.
|


|