In This Issue ... |
December 2006 |
GIMP Tips & Tricks III - Text and Filters ...Special text effects and filters can really help the creative process when working on an image in GIMP. In this last of a three part series, I'm going to be giving you ideas and tips to help you get started. As you use and become more comfortable with GIMP, you will have lots of WOW moments.
When you have everything the way you want, click anywhere on the image. You will then see another box. This is the text editor where you can type your text. Click the Close button when finished and your text will appear on your image, in its very own layer. Check out the layers pallet and you will see your text. Click the Move tool (looks like crosshairs and is just above the paint bucket tool in the toolbox) then click on your text on your image to move it anywhere you want.
About your toolboxes and various other extra helper windows ... Working with Text Blocks ... Keep your text snippets small. You can type several lines of text in the text editor, but when it appears on your image, it will all be on one layer. When you move it, all the text on that layer will move. If you want more versatility, do a separate entry for each line. This will put each line on its own layer and you will be able to arrange different bits anywhere you want. If you want to change the position of any bit, just click its corresponding layer and reposition it. Layers and Special Effects for Text ... Layers give you all kinds of options to make the most of your special text. When you first create your text, you are pretty much stuck with the font choice, color and size. Once you have those little issues knocked out, and your text is on a layer, you will need to convert your text to an image (path) before you can experiment with special effects. Make a copy of your text layer by clicking the text layer in the layers panel. Then click the Duplicate Layer button at the bottom of the layers panel (just to the left of the anchor button). This will give you a copy to play with. You can always delete it and make another copy if needed. To convert your text to a path. Select the text layer, making sure the text tool is active. Then click the Create path from text button at the bottom. Your text won't look as though it has changed, but if you click the paths button at the top of the layers panel, you will see your converted text. Right click that path layer and choose Path to selection. You should now be able to begin applying various filters to see what you can do. While there aren't a lot of things you can do with text as far as filters an special effects are concerned, the Drop Shadow is great. Click Script-Fu, then Shadow, then Drop Shadow. Make your choices in the dialog box that will appear, then click OK. Not only will you end up with a nice shadow behind your text layer, but the shadow will be on its own layer. Using Filters and Special Effects... The filters and Script-Fu special effects really shine on image layers. This is where your experimenting can really pay off with many unexpected and lovely results. Select the layer you want to tinker with in the layers panel. Then click the word Filters or Script-Fu and begin selecting special effects. Some you may not like. That's what CTRL+Z (undo) is for. But others will certainly surprise you. Have FUN with them! Additional Resources to download and learn more about using GIMP...
Gem - Dia for Windows...Dia is a full featured (FREE) program to draw diagrams. It is very similar to Microsoft's Visio (not free). It is very simple to use, just drag, drop and click. The toolbar is intuitive, and if you have used expensive diagram programs in the past, you will know exactly what to do. The download is a little under 5 Mb and there is plenty to read on the website to make sure you know what you are doing before you download and install this baby. ENJOY! http://dia-installer.sourceforge.net/index.php
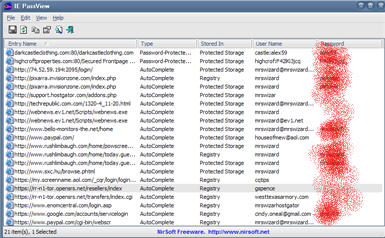
Tiny Treasure ... IE PassViewAbsolute FREEWARE ... Less than 100 Kb download. Nothing to install. Just run the .exe file and it will list all the user names and passwords you have stored in Internet Explorer (including the newest Internet Explorer 7). You can even save the list for future reference and those special "brain cell challenging" moments. GREAT little no fuss, no muss utility!
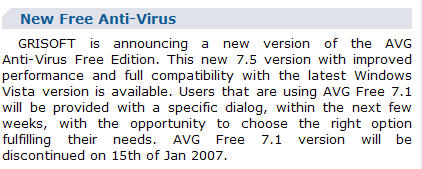
Quick Tips ...AVG FREE Alert! ...I turned on my machine early one morning in November only to find a strange message from my AVG (free version) antivirus software, suggesting my version (7.0 something) was about to be discontinued in January 2007. There was a link to more information about the new (not free) version 7.5. Well, I clicked the link thinking, "O Lord! The free ride is over for AVG!" ... Not so, dear readers. Although I DID have to look for it, there was a link for the FREE version of 7.5. WHEW!
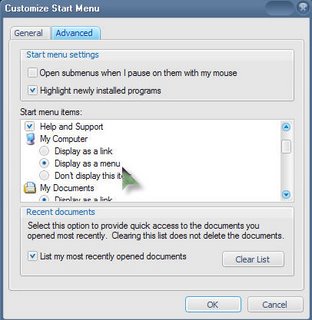
Not only is there a new version of AVG FREE Antivirus, but they have a new anti spyware software (FREE Edition also) available. I haven't given that a try yet, but will soon. Thank you AVG! Here is a link to the latest and greatest FREE AVG offerings. Create a Drive Menu for My Computer ...In Right click the Start button and choose Properties. Click the Customize button in the Start Menu tab area. When the Customize Start Menu box appears, click the Advanced tab. Under My Computer, place a dot in the box next to the words Display as a menu.
Special Note ... There are a lot more QuickTips each month in the Member area. AND I've gathered up all the videos and other goodies in the member area too, so they are nice and handy. You won't have to dig through old newsletters to find them. All it takes is a one time donation to show you care, and the member area is all yours! For more information...
|
I was always taught
|
|
Memory Dump:
|
||
May the bugs
|
||
|
Got more questions? Search mrswizard.com and compuquicktips.com with Google! Want to have access to ALL the daily tips (mucho plenty and growing!) in one convenient place, all at once? Not to mention an awesome wallpaper collection AND Screensavers! Make a small (one time) donation and gain member access to the Happy Dragon area. Mrs. Wizard | Newsletter Archives Copyright© 2006 Cindy L. O'Neal |
|
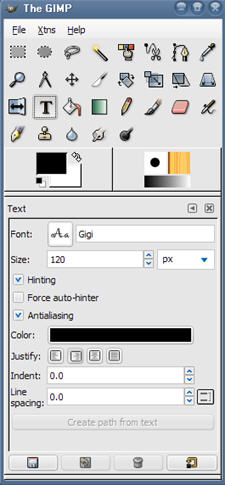 When you click the Text tool in GIMP, then click anywhere on your image, the wheels begin turning for a great adventure in interesting text effects. The text tool look like the letter T. You can't miss it on the main GIMP toolbar. Click any of the tools on the toolbar and you will see additional options for each tool below (in the same toolbar). The text tool is no exception. Once you click it, look directly below and you will see the word Font and Size. Click the little button to the right of the word Font to see all your font choices. Click the font you want to use to select it. To change the size of the font, use the little up and down arrows to the right of the number in the size box. There are other choices below the font and size boxes you can fiddle with too.
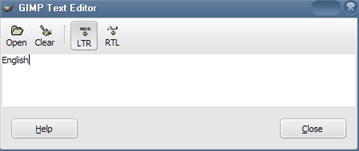
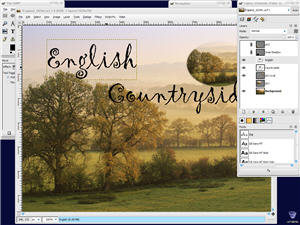 You can arrange your Layers pallet and main toolbox anywhere you want on your screen. You may want to arrange them so the title bars of each little helper is across the top of your screen. When you click on the actual image to work on it, it will pop to the front. The title bars of the little helper boxes will be handy, and just a single click on any one of them will cause it to pop to the front and do your bidding.
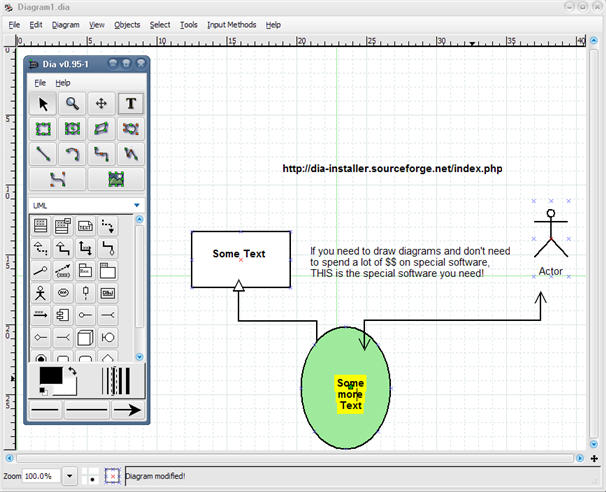
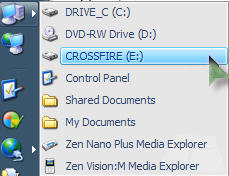 stead of clicking your My Computer icon, then clicking the drive you want, wouldn't it be nice to have a nice little menu where you can choose anything in the My Computer area?